The Smoker
From time to time I add a post that is equipment related rather than documenting a cook. This entry deals with refurbishing a New Braunfels Black Diamond which I have recently acquired for the princely sum of $40. It is in usable shape but will benefit from some cleanup and paint. While I'm at it, I will replace the wood parts, some of which are painted bright green and others black. This article will be published when work is started and updated as it progresses.This is an offset smoker and I believe it mirrors the design that has it's roots in oil field pipe. Pipe sections were cut and welded to make a fire box and smoke chamber. The Black Diamond (AKA NBBD) is made from 1/8" steel bent into shape with end pieces and hinges welded in place and legs, handles and so on bolted to the shell. New Braunfels has been purchased by Char-Broil which specializes in rather flimsy equipment has apparently retired the name. (They do sell a smoker branded as Oklahoma Joe which may match the quality of these older units.)
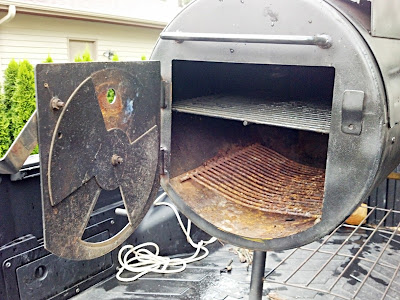
This is how the smoker arrived home:
It has been painted on the outside but the inside of both firebox and smoke chamber show considerable rust. The firebox has a false floor - a piece of curved sheet metal covering the floor of the box - which has nearly rusted away.
All other parts appeared sound. Based on the rust in the smoking chamber and presence of charcoal grates, I think the previous owner was grilling in the smoking chamber which burned the seasoning off the bottom and led to rust. It also burned the finish off the outside of the smoking chamber on the bottom.
Refurbishing (2013-08-07)
The primary goal is to stop further rust in both firebox and smoke chamber. Secondarily, the appearance will be brought back up to something close to 'as new.' Since I will only be using this as a smoker, I can protect the smoking chamber with a good seasoning of cooking oil. It should not get hot enough to burn off. The firebox will get a coat of high temperature paint. (Rustoleum High Heat Ultra Grill Paint which should be good to 1200°F) To make it look good, the wood handles and shelf will be replaced with stained oak and the rest of the exterior will get a coat of the grill paint.
First step was to hit it with the pressure washer at the highest pressure setting. That cleaned out quite a bit of the interior deposits and removed some loose rust. After doing that I separated the firebox from the smoking chamber and started at it with a wire brush on a 4 1/2" angle grinder. That gets more stuff off but also kept running afoul of the other attachments. I also saw that the exterior finish was rather durable, being generally resistant to the wire brush! I started removing parts and kept working at cleaning things up. The worst exterior rust was on the underside of the smoking chamber.
There was also a grease spot that resulted from my first cook. I took a scrub brush to it with some Dawn and soon saw that water was beading up on other parts of the exterior. I removed the rest of the exterior pieces and continued scrubbing to no avail. Next step is to hit the exterior with some oven cleaner which should remove any grease film that could interfere with paint adhesion. Before I gotten too far on this, I had removed the legs and disassembled the cooker the rest of the way. Tomorrow work should proceed with a thorough degreasing of the exterior parts.
After degreasing, I painted the firebox inside and out with the paint described above. The smoking box got paint on the outside only as I planned to spray the inside with Pam to prevent further rust. Before I was done, I had used three cans of paint for multiple coats. This left it with a fairly shiny appearance and preserved the rough texture of the original finish (where it still existed.) With days climbing into the 90s, I found that the smoker would reach a temperature of 150°F in the sun so I did that for several days to begin the burn in process for the paint. (The directions for this paint do not specify a burn in but I expect it will help with durability.)
I used the same stain on the new wood parts that purchased for the Weber Sequoia I am also
restoring. Why not? It cost enough and only came in gallon or bigger sizes.
The resulting appearance is rather orange looking.
The last thing I needed to do was replace the fire shield in the fire box. I bought a piece of 18 gauge metal that was 12" x 18" and cut it to 17" (the length of the fire box.) I bent it to approximately fit the firebox and painted it with 2000°F high heat paint. This one does require a baking process and I did the first two steps in the oven (250°F and 400°F) and the last will be done in the cooker itself, if it ever gets to 600°F.
Had to spruce up the logo as well.
Burn In (2013-09-04)
Here is the cooker fully assembled.
Starting with a small fire.
To the coals I added chunks of oak and maple to bring the fire up. I'm learning more fire management as I go. Below is a table of various temperature readings I took during the burn in process. I presume the grate temperature was hotter than what I read on an outside surface.
| time | fb door | fb floor | fb back | sc door | sc end | sc back | sc bottom |
| 3:00 | 320 | 294 | 330 | 205-170 | 165 | 180-210 | 140 |
| 3:50 | 247 | 234 | 252 | 187-160 | 158 | 195-170 | 140 |
| 4:30 | 385 | 417 | 415 | 260-215 | 220 | 265-230 | 181 |
| 6:00 | 445 | 385 | 457 | 290-230 | 230 | 280-230 | 191 |
I'll also need to clean up the patio after this is done as some Pam is leaking out and dripping on the pavement. (I sprayed Pam in both cooking and smoking chambers as well as lubing the hinges with a shot.) During the burn-in I also discovered that Pam softened the paint. Where I tried to wipe pam drips off the outside of the cooker, it took the paint off too. I guess it would have been a good idea to burn-in one cycle w/out Pam to set the paint and then a second burn-in to set the Pam. As it is, the Pam on the inside surfaces seems to have set reasonably well after I stopped adding fuel and the cooker cooled off. Now I need to figure out how to make a cover for it so it need not remain stored in the garage.


what is the model number of your smoker ?
ReplyDeleteNo idea. Is it marked somewhere on the smoker?
DeleteNo idea. Is it marked somewhere on the smoker?
ReplyDelete