Thursday, October 10, 2013

Bell Peppers and Beef

With a nod to Jet, I'm making Bell Peppers and Beef today (AKA Pepper Stout Beef.)

Weather is very pleasant at start with temperature at 54°F and wind light at 6 mph. The pit location is sheltered by high fences so it is really pretty calm. The sky seems a little hazy so there is not much sun.

We picked up a 4.8 lb chuck roast at the grocery along with some peppers, onions and rolls. I'll be following the Wolf Pit recipe which I found on BBQ-Brethren.com. I also got some mesquite chips

I'm cooking away from home so this will be a bit of a minimalist cook. I have at my disposal a 22.5 Weber kettle and a proper charcoal chimney. We also got some mesquite chips so I'll be using those for some additional smoke flavor. Since I have no charcoal baskets, I plan to use the snake method for charcoal fire management. That involves a triple row of briquettes aroud the edge of the charcoal grate that is then set with some lit charcoal at one end of the 'snake.' Since I'm not looking for 'low and slow' specifically, I will employ two snakes. Desired temperature is about 275°F. If it runs a little high, I can moderate with by choking off the bottom vent. I need to have this ready to serve by 2:00 PM so I have to keep it moving. The only temperature measuring device I brought with is my Maverick Weekend Warrior so that will be used to spot check the cooker as well as the meat.

Two snakes on fire in the hole! (Good threads on this technique can also be seen at http://weberkettleclub.com/forums/food-pr0n/my-salute-to-1buckie/ and http://weberkettleclub.com/forums/grilling-bbqing/first-time-snakeminion-method-criticism-welcome/)


Salt and black pepper for the rub - KISS!


Lit coals on the snakes.


I think we're ready to add meat!


Looking good at the two hour check.


The bed peppers and onions is ready for the next stage.


But I do not need all of that stout for the recipe. Hmmm... What to do with the rest. :D

Ready for the next stage!


Once it has cooked long enough the beef shreds easily.


Food stylists have no fear of me!


timetemp comment
7:48 AM
Close up the cooker
8:00382° meat(lid)Meat on! (Bottom vent to about 1/2 open.)
8:47341°Looking good - figuratively speaking. I did not open the cooker. (If you're lookin' you're not cookin'.)
9:43331°
10:00(143°)Opened to check progress. Good!
11:22302°(174°)Transferred meat to the cast iron pan with veggies and covered with foil. Since the cooker is cruising along I just put it back on the kettle.
11:36309°Would go full open on the bottom vents but have just been advised that I have until about 5:00 PM to finish so no need to rush!
12:20 PM245°Opened bottom vent full and threw a few more briquettes on.
12:45245°Firing up the gasser to move the cook to that.
1:20250°Temp near the middle of the gasser with two outside burners on lowest setting. I cranked them up a little.
1:40309°Cranked up a little more.
2:00(204°)Removed the cover from the meat. Parts are not yet probe tender. I tore it into chunks as best as I could and it will cook further as the liquid reduces.
3:00
Beef is shredding easier now. Once the liquid is reduced a little more it will be ready to serve.
3:30?
Off the fire ad shredding easy!

meat°(lid°) => measured using a Maverick Weekend Warrior either poking in one of the vents or stuck momentarily into the meat.

This was very tasty. I used only three jalapeƱos vs. the five recommended and it was appropriately hot for our tastes. The meat was very tender and moist. Yum!

How could I improve this? Hard to say. My first reaction is to suggest some additional seasonings such as bay, thyme or cumin. I also thought that a tomato or two sliced into the mix would add an additional layer of flavor. There was certainly nothing wrong that I need to fix. I suppose I could use one green and one red pepper for more color.

Tuesday, September 17, 2013

Brisket on the offset

This is the first post-restore smoke on the New Braunfels Black Diamond (NBBD.) I'm firing it up pretty much unmodified just to see how it works as designed. I found a large brisket  at Sam's - 14 lb - that might actually be a packer.

It is 52°F as I start the fire with a predicted high of 70 today. The sky is clear and the wind is very light at 0-5 mph.

I trimmed as much fat off the brisket as I could and rubbed liberally with salt and pepper. I'll smoke fat side down and put some of the trimmings on top to help keep the meat basted.

Fire was started with a mini-chimney of lump and then stoked mostly with oak splits with some apple and maple mixed in. The fire box got hot enough to ignite splits warming on the shelf!

timetemp comment
8:25°Got some hot coals on some wood in the fire box.
8:38443°/484°FProbably put too much wood in the fire box and temper is climbing right up! I'll let it burn down a bit before I put any meat in there. I'm using a mix of oak and maple to get things started. I'll probably add some apple as things go along.
8:45482°/HHHOverranged the probe closest to the fire so I closed the slide about half and removed the probe from the smoke chamber.
9:06
Meat on! Fat side down. Draped liberally with the trimmed fat.
9:15234°/45°Threw some more wood on.
9:37261°/59°Temperature had come up and was dropping so I threw in some more wood before going for a run.
10:24189/93fire down to coals - stoked with oak.
11:06194/120down to coals again, stoked the fire with more oak.
11:48235/136
12:16316/153
12:51304/172Temp dropping a bit and time to wrap in paper
2:32277/199Temp falling off, time to probe. Probing pretty tender but still some resistance under the point. Threw one more split in and will probably leave it at that.
3:00248/207Time to rest my meat.

It seems like the cooker in stock form likes to run about 320°F or so. For the last stick, I've cut the draft port to about half to see what that does. (Another NBBD owner told me it holds 225-250 at 1/4 slider opening.) Paper wrap seemed to work OK. It captured a lot of liquids by the end of the rest. Meat toward the thick end was terrific! The other end was pretty chewy. I think that the temperature distribution is pretty uneven. 

What to do differently next time...

  1. Install some kind of tuning plate for more even heat distribution.
  2. Run with the door slider at 1/2 or 1/4.
  3. Run less than 4 miles between tending the cooker.
  4. Crumple some foil to make a gasket for the stack. It looks pretty leaky at the base.

Thursday, September 5, 2013

Firing up my Sequoia

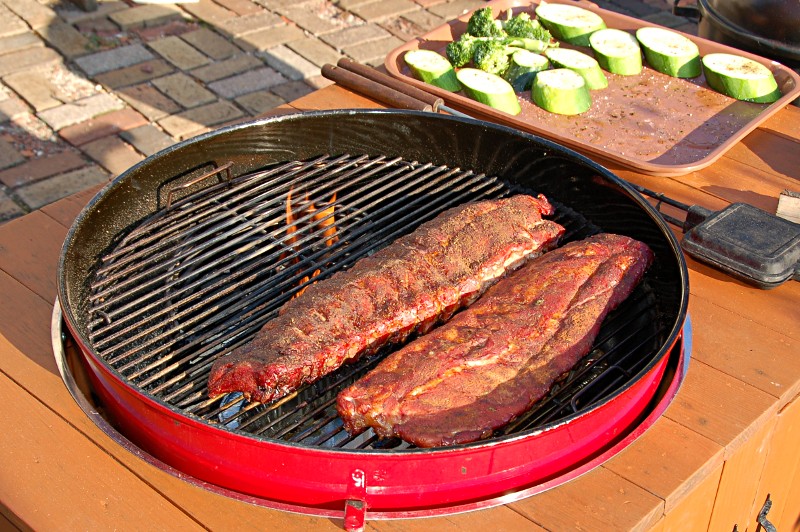
The effort to clean up and refurbish my Sequoia grill is nearly complete. (I still have to get H/W to mount the towel rings.) Today I do my first cook in it. I had gone to the store with plans to pick up some salmon steaks to grill. I found baby back ribs on sale for $2.99/lb. and since that's the first thing I ever cooked on a Weber kettle, I decided it would be appropriate for the first cook on the Sequoia since it has come into my hands. To go with, I'll grill some spuds and broccoli and squash. To avoid the conflicts between grilling and smoking, those will be done on my 18" kettle.

Weather is pleasant at 73°F with wind light at about 10 mph. The sky is clear of clouds resulting in bright sun.

I peeled the membrane off the back side of the ribs and rubbed one rach with Slap Yo' Daddy rub and for the other I used some rub left over from a previous cook.


Ribs will be done in the Sequoia using a wire basket to hold the coals and a drip pan under the ribs. I'm going to use Coshell (coconut shell) charcoal for this because it seems to burn slowly and with less heat - ideal for ribs. To the briquettes I've added some oak, pecan and apple chunks for smoke. Shortly after closing the cooker I went to a single bottom vent wide open and I'll monitor cooker temperature through the lid vent using the Weber thermometer.


timetemp comment
2:35
Fire in the hole! Lit coals are put with the smoking wood in the basket in the grill.
2:50320°Meat on!
3:11320°Seems to be holding steady at 320° with a single vent open.
3:35340°Closed single bottom vent to half. I'd prefer temps about 300°
4:00290°That's better. Ribs look good!
4:45
Added more smokin wood and stirred the (mostly burned up) coals.
5:00250°Ribs looking good but not starting to pull back on the bones. Opened the one bottom vent full and stirred the ash that had fallen on it. Need to bump things up a bit. I'd be happy to be resting the ribs now. Starting lump for the veggies.
5:20275°Opened another bottom vent.
5:30300°Let's get this show on the road! (SWMBO will be home any minute and the ribs are not done.)
5:54340°(Not peeking...)
6:20300°Threw some lump on for a faster finish. I'm getting hungry!
6:40
Meat off! One slab closest to the coals was done and the other finished in the oven.

5:30 - I want them done!


Results: The ones with my rub were a little over seasoned. The rub was good for a butt but I applied too much on ribs. I was also disappointed not to have the ribs finish on time and on the grill. But dinner was good anyway. Did some veggies on another kettle


And had enough coals left to make some peach pies. :D


What to do differently next time: Start earlier. Add briquettes more frequently. (The Coshell briquettes seem not to last longer than other briquettes.) Go easy on my rub.

Thursday, August 29, 2013

A little brisket and a bottom round

Two separate pieces of meat to be cooked in their own way. The brisket will be done low 'n slow on the smoker until it is tender. The beef round does not have sufficient fat for this treatment so I will roast it until the Internal temperature is 120°F and slice it like Italian beef. It will be cooked on the 18" kettle. The brisket was just over 6 lb and the bottom round, nearly 4 1/2.

Weather has been hot and muggy. It was 80° already when the meat went on. Wind is light at about 5 mph and the sky is overcast.

Both pieces of meat are getting a simple treatment with salt and pepper only. The brisket was just a bit too long to fit on the mini-WSM so I trimmed a triangle off the skinny end of the flat. I flipped this over and lay where I cut it and saw that the two pieces were about the same thickness of the other end of the brisket. I decided to cook it that way to see if that helped to get more even cooking overall. I also trimmed some of the fat off the brisket. the final disposition of this is that the fat side of the main piece was down and the fat side of the small triangle was fat side up. I spread a couple more pieces of the trimmed fat on the other parts of the brisket to render into the meat as it cooked.

The round had a fat side which I started down with some of the fat trimmed from the brisket spread over the upper surface.

The brisket is going on the mini-WSM with a foiled pan. I fired it with K-comp briquettes and and some oak, mesquite and apple. The lower vents were partially open and I just left them as they were. This will likely be a semi-high heat cook. The time/temperature profile below is for the brisket in the mini.

The round will be cooked in the 18" kettle where I used a single wire basket to hold Cowboy Lump (meant to use Mesquite lump but wasn't paying attention...) with some mesquite and apple for smoke. All vents are wide open. I used the lid from a Dutch oven as a drip pan under the round. About half an hour after firing this up and putting the meat on, a thermometer stuck through the lid vent read about 300°.

timetemp comment
10:50 AM
Meat on! (Brisket, round went on about 15 minutes later.)
11:4593°/331°
(meat/cooker)

12:33140°/309°
1:24165°/203°The cooker temperature makes no sense. I might have bumped the probe when I opened the cooker to check about half an hour ago. As long as the meat temp keeps going up. I'll leave it be. On last check, the kettle was running about 300° and the round looked good. Round measures 139° internal so it's coming off!
1:43174°/304°Repositioned the cooker probe where it was not under the meat and could have meat juices dripping on it.
2:45187°/315°
3:51199°/306°Need to probe the brisket! Still pretty firm - letting it go a little longer.
4:45205°/300°Meat off! Probing tender enough for me. ;)

The bottom round came off first. I had planned to take it to 120° but the first time I  checked it, it was already at 139°. I took it off then and covered with foil to rest. I captured the meat juices as it rested and added them to the drippings captured in the cast iron pan. To that I added about a cup or so of water and some beef soup base to make the au jus. I also added about a tablespoon of potato starch. The beef was still on the tough side, but I sliced it as thinly as possible and it made a decent Italian beef.


The brisket was very tasty.  It was perhaps a bit on the dry side but not objectionably so. Tenderness was also good. The test of doubling  up the thinnest portion seems to have worked well. I didn't think the thin end was overdone compared to the thick part.


With the round, I might try a pot roast style cook with the meat sitting in juices while it smokes. Slicing (shaving off thin slices) is a fair bit of work. On the brisket, I would like to find a bigger one. Just over 6 lb was the biggest one they had at Sam's! I also really need to try wrapping it. I guess I should bite the bullet and buy some butcher paper at Sam's club so I can wrap just like Aaron.

Guilty pleasures ... The fat that I trimmed from the brisket and placed on the brisket and bottom round rendered and came out really good. :D

Friday, August 9, 2013

Cindy asked if farm raised salmon tastes different from wild caught. I did not know the answer so when I saw both in the fish case at Sam's I bought some of each to try. Some will be grilled while the rest will be smoked on a mini using cherry wood for smoke.

Weather at the start of the cook is about 78° and wind has picked up a bit to 9 mph. The sky is a little cloudy.

The salmon prep was simple to avoid coloring the results. I wanted to see what the difference was. I  seasoned with salt and pepper.

The meat was divided between smoker and grill. Smoking was done with briquettes and some cherry for flavor. Grilling was similar.


timetemp comment
4:44PM 
Salmon on the smoker!
5:12325°Salmon beginning to firm up. Will give it a few more minutes.
5:20 325°Salmon off!


The color of the wild caught salmon was deeper in spite of the coloring added to the farm raised. There is a distinct difference in flavor as well. The wild caught fish had a more robust salmon flavor. Both were good and I have a hard time deciding whether to pay more for wild caught or not.

What to do differently next time: My only disappointment was that I slightly overcooked the grilled salmon. I prefer it a little on the rare side and it was cooked through. It goes so fast!

Butts for a birthday

Our first grandson turned two this week and we celebrate tomorrow. I have been honored by being asked to provide pulled pork for 25. I was hoping to find a pack at Sam's in the 20-22 pound range but was disappointed to find the largest pack was about 17 pounds. I got two of the smallest packs that were about 14 pounds. I'll have a little extra. I'll also do a couple naked fatties for the birthday boy.

Weather is very pleasant at about 70° and sunny with wind light at about 4 mph. We should climb to near 80° by afternoon.

I used a rub recipe similar to the previous cook with the addition of a couple tablespoons of oregano as follows:
  • 2 Tbsp black Pepper (whole)
  • 2 Tbsp Rosemary (dry, whole)
  • 1 Tbsp Coriander (whole)
  • 1 Tbsp mustard seed
  • 2 Tbsp Hungarian Paprika.
  • 1 Tbsp Adobo seasoning
  • 1 Tbsp powdered onion
  • 2 Tsp Cayenne pepper
  • 1 Tbsp Cumin
  • 2 Tbsp powdered garlic
  • 2 Tbsp Kosher salt
  • 2 Tbsp sugar
  • 2 Tbsp Oregano
These somewhat smaller butts are going on the 18.5 WSM (Weber Smokey Mountain.) The water pan is foiled and for the first time ever, I am using Kingsford Competition briquettes. For smoking wood I'm going with chunks of hickory, black walnut and apple.

timetemp comment
9:00 am
propane on the mini-chimney about half full
9:10
partially lit chimney set on cooker.
9:20
lit chimney emptied on the fire lay and cooker closed up. Closed two bottom vents to about half and the third is fully closed.
9:45
Temps in the cooker around 260° and stable so meat on!
10:15217°/48°/112°/230° (grate/pork/fatty/lid)
10:50214°/68°/152°/220°Opened one closed bottom vent to about 1/2.
11:13252°/81°/163°/255°Time to take the fatties off the cooker.
11:58279°/108°/x/270°Closed one bottom vent. (two remain half open.)
2:17 pm275°/160°/x/250°Moving right along!
3:40262°/171°/x/250°
4:13243°/171°/x/235°Time to fiddle with the fire. Found lots of ash on the coals so I stirred them a bit and tapped on the grate so it wold fall through. Left lower vents as is (2x 1/2 open.) Boy that sure smells good!
5:05264°/172°/x/???
5:20248°/172°/x/225°Added a couple handfuls of charcoal (left overs including some lump.) Need to get this show moving! Will open the third vent 1/2 also.
6:05255°/174°/x/220°Just added a couple more handfuls of new briquettes and opened two bottom vents full.
7:05280°/181°/X/275°Now we're cooking!
8:02302°/196°/x/???cooker closed up, meat on.
8:37158°/198°/x/175°meat off!

The butts were great! Some parts were a little harder to pull and others pulled very easy. Maybe they could have gone a little longer, but the result was very tasty.


Not sure I would do anything differently next time.

Wednesday, August 7, 2013

New Braunfels Black Diamond

The Smoker

From time to time I add a post that is equipment related rather than documenting a cook. This entry deals with refurbishing a New Braunfels Black Diamond which I have recently acquired for the princely sum of $40. It is in usable shape but will benefit from some cleanup and paint. While I'm at it, I will replace the wood parts, some of which are painted bright green and others black. This article will be published when work is started and updated as it progresses.


This is an offset smoker and I believe it mirrors the design that has it's roots in oil field pipe. Pipe sections were cut and welded to make a fire box and smoke chamber. The Black Diamond (AKA NBBD) is made from 1/8" steel bent into shape with end pieces and hinges welded in place and legs, handles and so on bolted to the shell. New Braunfels has been purchased by Char-Broil which specializes in rather flimsy equipment has apparently retired the name. (They do sell a smoker branded as Oklahoma Joe which may match the quality of these older units.)

This is how the smoker arrived home:


It has been painted on the outside but the inside of both firebox and smoke chamber show considerable rust. The firebox has a false floor - a piece of curved sheet metal covering the floor of the box - which has nearly rusted away.


All other parts appeared sound. Based on the rust in the smoking chamber and presence of charcoal grates, I think the previous owner was grilling in the smoking chamber which burned the seasoning off the bottom and led to rust. It also burned the finish off the outside of the smoking chamber on the bottom.

Refurbishing (2013-08-07)


The primary goal is to stop further rust in both firebox and smoke chamber. Secondarily, the appearance will be brought back up to something close to 'as new.' Since I will only be using this as a smoker, I can protect the smoking chamber with a good seasoning of cooking oil. It should not get hot enough to burn off. The firebox will get a coat of high temperature paint. (Rustoleum High Heat Ultra Grill Paint which should be good to 1200°F) To make it look good, the wood handles and shelf will be replaced with stained oak and the rest of the exterior will get a coat of the grill paint.

First step was to hit it with the pressure washer at the highest pressure setting. That cleaned out quite a bit of the interior deposits and removed some loose rust. After doing that I separated the firebox from the smoking chamber and started at it with a wire brush on a 4 1/2" angle grinder. That gets more stuff off but also kept running afoul of the other attachments. I also saw that the exterior finish was rather durable, being generally resistant to the wire brush! I started removing parts and kept working at cleaning things up. The worst exterior rust was on the underside of the smoking chamber.


There was also a grease spot that resulted from my first cook. I took a scrub brush to it with some Dawn and soon saw that water was beading up on other parts of the exterior. I removed the rest of the exterior pieces and continued scrubbing to no avail. Next step is to hit the exterior with some oven cleaner which should remove any grease film that could interfere with paint adhesion. Before I gotten too far on this, I had removed the legs and disassembled the cooker the rest of the way. Tomorrow work should proceed with a thorough degreasing of the exterior parts.

After degreasing, I painted the firebox  inside and out with the paint described above. The smoking box got paint on the outside only as I planned to spray the inside with Pam to prevent further rust. Before I was done, I had used three cans of paint for multiple coats. This left it with a fairly shiny appearance and preserved the rough texture of the original finish (where it still existed.) With days climbing into the 90s, I found that the smoker would reach a temperature of 150°F in the sun so I did that for several days to begin the burn in process for the paint. (The directions for this paint do not specify a burn in but I expect it will help with durability.)

I used the same stain on the new wood parts that purchased for the Weber Sequoia I am also
restoring. Why not? It cost enough and only came in gallon or bigger sizes.


The resulting appearance is rather orange looking.


The last thing I needed to do was replace the fire shield in the fire box. I bought a piece of 18 gauge metal that was 12" x 18" and cut it to 17" (the length of the fire box.) I bent it to approximately fit the firebox and painted it with 2000°F high heat paint. This one does require a baking process and I did the first two steps in the oven (250°F and 400°F) and the last will be done in the cooker itself, if it ever gets to 600°F.


Had to spruce up the logo as well.


Burn In (2013-09-04)

Here is the cooker fully assembled.


Starting with a small fire.


To the coals I added chunks of oak and maple to bring the fire up. I'm learning more fire management as I go. Below is a table of various temperature readings I took during the burn in process. I presume the grate temperature was hotter than what I read on an outside surface.

timefb door fb floorfb backsc door sc endsc backsc bottom
3:00320 294330205-170165180-210140
3:50247 234252187-160158195-170140
4:30385 417415260-215220265-230181
6:00445 385457290-230230280-230191

I'll also need to clean up the patio after this is done as some Pam is leaking out and dripping on the pavement. (I sprayed Pam in both cooking and smoking chambers as well as lubing the hinges with a shot.) During the burn-in I also discovered that Pam softened the paint. Where I tried to wipe pam drips off the outside of the cooker, it took the paint off too. I guess it would have been a good idea to burn-in one cycle w/out Pam to set the paint and then a second burn-in to set the Pam. As it is, the Pam on the inside surfaces seems to have set reasonably well after I stopped adding fuel and the cooker cooled off. Now I need to figure out how to make a cover for it so it need not remain stored in the garage.